Getting Started With Clojurescript Development - Setup
We have seen miraculous progress in frontend development in these few years - the domination/monopoly of javascript, AJAX, node.js, the rise and rapid iteration of javascript libraries/frameworks and Single Page Application (with the current crop being Angular, React, Vue, as well as many others). But we’ve also experienced growing pain - the churn rate of libraries is way too high1, javascript as a language (and as part of the toolchain) is too hopelessly ill-equipped2 to deal with the demand of modern frontend space, with attendant attempts to either patch over (transpiling languages such as Coffeescript and Typescript), reform (ES-whatever), or outright replace (WebAssembly) it.
Clojurescript is a solution in the “patch-over” category that bring the elegance and pleasure of writing program in Clojure to the web. More importantly, Clojurescript has placed a strong emphasis on Interactive development, and has been leading other technology stack over the years.
Background
This section is written to help frontend developer / non-programmer get some context so they can understand where some of the apparently strange things in Clojurescript tooling come from. If you are a backend developer, please feel free to skip this section. (By the way, I’m not an expert in tooling so if you have deeper info, please leave a comment below. Thanks!)
Before Clojurescript, there is Clojure, a JVM-hosted, general purpose language. JVM is a nice platform that largely eliminates cross-platform issues (barring the JNI and JNA) while providing competitive performance (except bare-metal), and has widespread adoption especially in the enterprise world. The standard language on top of JVM is Java (not to be confused with javascript of course), which is arguably flawed, but has been used and deployed in so many places that it is effectively irreplaceable. Clojure is a language built on top of Java, and so can be run on the JVM. This choice let us leverage both the strength of the JVM platform, as well as the monumental amount of libraries in Java.
The major build tools for Clojure (and Clojurescript as it turns out) is lein and boot. A simple way to distinguish them is that lein is declarative while boot is more imperative. I will not go into discussing their relative merit and will use lein all the way. (Ya, that’s lazy, I know)
So what’s the point of all these talks? Although Clojurescript compiles to javascript, it still uses lein/boot as its build tool (which make sense in retrospect - it is really bad to fragment something as fundamental as build tool unnecessarily - and Clojure/Clojurescript is supposed to be very close, differing only in their interpretive/compilation target), and so you will need to install the JDK/JRE/JVM (See this page for the fine prints of their differences), as lein is a Clojure program and so ultimately runs on that.
Prerequisite
As the last section explains, you will need to have installed the JDK (Java Development Kit - which includes an implementation of JVM plus development tools such as the Java Compiler.)/JVM and then lein.
For the JDK, it is recommended to use JDK 8 though version 6 or 7 works as well - see the official website. One caveat - there was some compatibility issue with JDK 9 - see here for example.
Once you have a working Java installation, visit the homepage of lein and follow the install instruction there.
A Basic Project Using Figwheel
After getting the prerequisites, let’s get started! Much like other modern ecosystems, this particular step has been “optimized” and is as easy as opening up your command prompt and typing:
lein new figwheel hello-world -- --reagent
Which will create a new folder hello-world containing a barebone project. (In frontend we call this kind of project-generation-from-template scaffolding) Figwheel is the tool that provides all those interactive experiences and niceties (we’ll see more later), while the last argument specifies which Clojurescript web framework to use (We choose reagent here).
For your reference here is the console output when generating new project:
Retrieving figwheel/lein-template/0.5.13/lein-template-0.5.13.pom from clojars
Retrieving figwheel/lein-template/0.5.13/lein-template-0.5.13.jar from clojars
Generating fresh 'lein new' figwheel project.

Change into your 'hello-world' directory and run 'lein figwheel'
Wait for it to finish compiling
Then open 'http://localhost:3449/index.html' in your browser
To run the project, just cd into the folder and type:
lein figwheel
Figwheel will pop up a browser tab (with default location localhost:3449) connected to your project, and the command prompt will turn into a Clojurescript prompt/REPL.
Here is a screenshot of what you get in the browser:
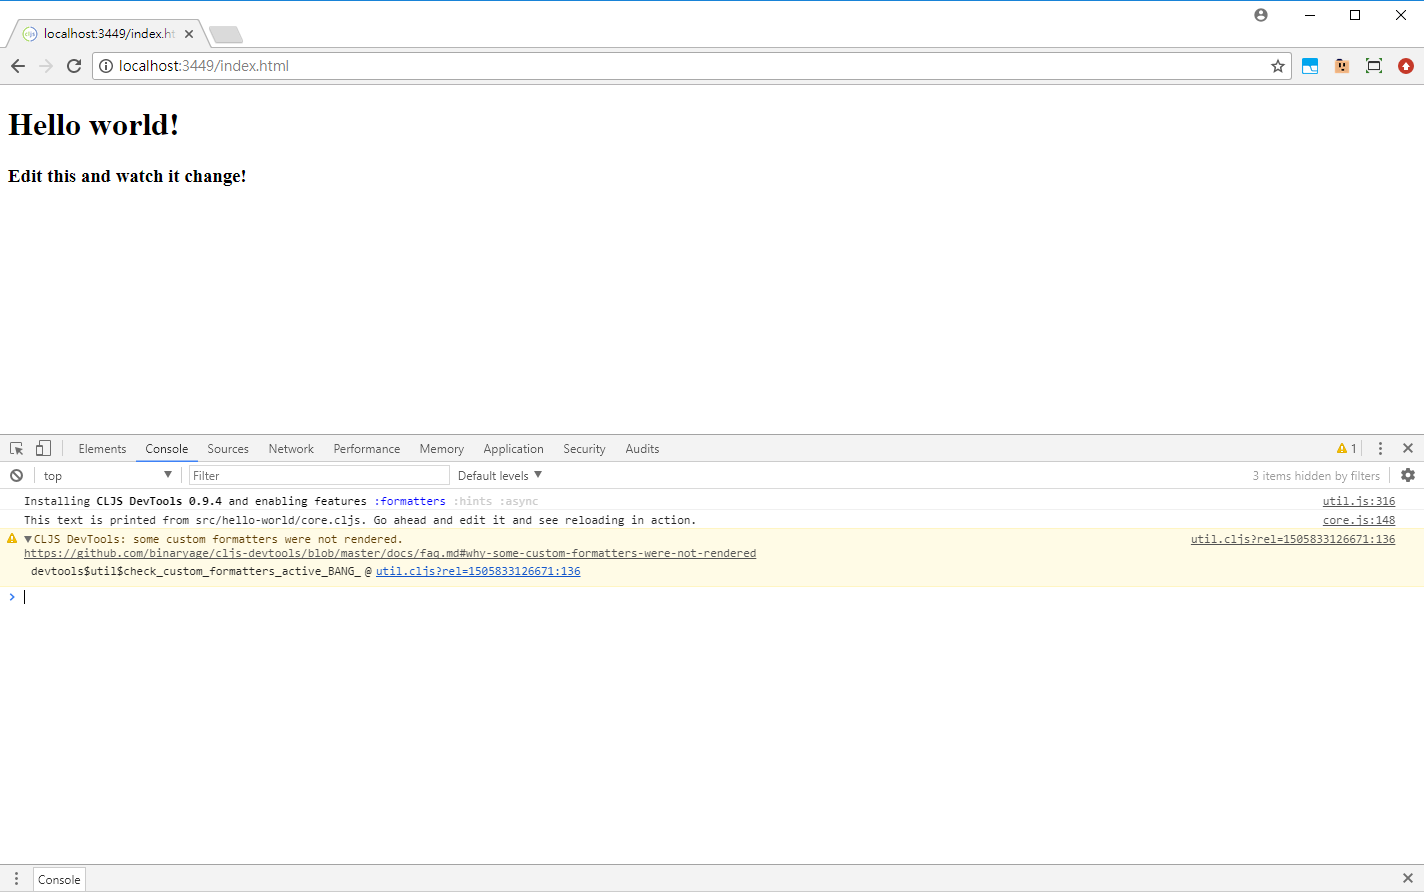
A barebone Clojurescript Project using the Reagent framework plus figwheel
while here is the console: (Notice that the first time you run a project, it will automatically download and install dependencies which may take a while. I’ve hidden those extra log for clarity)
*** Warning: This project requires Leiningen 2.7.1, but you have 2.6.1 ***

Get the latest version of Leiningen at http://leiningen.org or by executing
"lein upgrade".
Figwheel: Cutting some fruit, just a sec ...
Retrieving reagent/reagent/0.7.0/reagent-0.7.0.pom from clojars
Retrieving org/clojure/clojurescript/1.9.655/clojurescript-1.9.655.pom from central
Retrieving com/google/javascript/closure-compiler-unshaded/v20170521/closure-compiler-unshaded-v20170521.pom from central
...(snipped)...
Figwheel: Validating the configuration found in project.clj
Figwheel: Configuration Valid ;)
Figwheel: Starting server at http://0.0.0.0:3449
Figwheel: Watching build - dev
Figwheel: Cleaning build - dev
Compiling "resources/public/js/compiled/hello_world.js" from ["src"]...
Successfully compiled "resources/public/js/compiled/hello_world.js" in 27.267 seconds.
Figwheel: Starting CSS Watcher for paths  ["resources/public/css"]
Launching ClojureScript REPL for build: dev
Figwheel Controls:
          (stop-autobuild)                ;; stops Figwheel autobuilder
          (start-autobuild [id ...])      ;; starts autobuilder focused on optional ids
          (switch-to-build id ...)        ;; switches autobuilder to different build
          (reset-autobuild)               ;; stops, cleans, and starts autobuilder
          (reload-config)                 ;; reloads build config and resets autobuild
          (build-once [id ...])           ;; builds source one time
          (clean-builds [id ..])          ;; deletes compiled cljs target files
          (print-config [id ...])         ;; prints out build configurations
          (fig-status)                    ;; displays current state of system
          (figwheel.client/set-autoload false)    ;; will turn autoloading off
          (figwheel.client/set-repl-pprint false) ;; will turn pretty printing off
  Switch REPL build focus:
          :cljs/quit                      ;; allows you to switch REPL to another build
    Docs: (doc function-name-here)
    Exit: Control+C or :cljs/quit
 Results: Stored in vars *1, *2, *3, *e holds last exception object
Prompt will show when Figwheel connects to your application
To quit, type: :cljs/quit
dev:cljs.user=>
Before we move on, let me try to explain what’s happening behind the scene (This is quite complicated and I am really not sure I got all the details right, so yup - proceed at your own risk).
So we started the build tool/task runner lein. Figwheel (running as an ordinary program in your OS with file system access) will start to watch your source directory for any file change and invoke recompilation in real time. This is known as auto-rebuilding, and is actually provided by another plugin Cljsbuild which figwheel wraps.
At the same time it also launches a REPL environment that’s also provided in a vanilla clojurescript build. Since clojurescript compiles to javascript, it obviously needs a javascript execution environment. This makes thing more complicated as we want REPL to run in the build tool/lein we just spun up - we need to somehow connect them.
It turns out there is more than the obvious execution environment (browser vs node.js vs others, in case you’re long out-of-sync with the frontend space). For the case of browser, we just need to go to the browser (why, my dear ;) ) and open the page that loads those compiled scripts. It ought to also contain additional code fragment that makes a web socket connection to the lein process and then add the “suitable” event handler. (Web socket is used because it is two-way and real time, besides, it’s sorta cool)
Back in the REPL, it does listen for such connections and once they’re good, we can enter forms to evaluate, which the REPL handles by sending it to the browser/execution environment through the connection. The running program in the browser handle that message by calling clojurescript’s own eval inside its own environment, and then sending the result back.
So what additional values does figwheel provide? The answer is auto-reloading: plain clojurescript + REPL only re-compiles them. To do this, the “event handler” on browser’s side is enhanced to also accept command to reload particular namespace, which it do by default through calling functions in the Google Closure Library; the REPL is also beefed up to send those commands. Moreover, figwheel is smart enough to figure out what files truly need reloading and only reload those.
Another, slightly silly answer is that figwheel do the “go to browser and open the webpage” part for you automatically :P. It also hosts its own web server to serve those compile javascript and html files.
A Slow Tour of what we can do
Live code reloading and live REPL
Much like other web ecosystems, we can edit our code, save, and see the changes reflected immediately in browser. The main differences in figwheel are: 3
- No actual page reload is triggered
- Application state is preserved (provided you write reloadable code)
So let’s try it in the context of interactively developing a non-trivial application. Go to the file src/hello_world/core.cljs and edit as below, and then save:
(ns hello-world.core
    (:require [reagent.core :as reagent :refer [atom]]
              [clojure.set :as s]))
;;...
(def rainbow
    ["#FF0000"
     "#FF7F00"
     "#FFFF00"
     "#00FF00"
     "#0000FF"
     "#4B0082"
     "#9400D3"])

(defn gen-style [n k]
	{:width (* (/ k n) 100)
	 :height 12
	 :background-color (get rainbow (mod (- k 1) 7))
	 :margin "auto"})

(defn hanoi-tower []
    (let [hanoi-rod (fn [pos discs]
                       [:div {:id pos :style {:display "inline-block" :width 120}}
                             (map (fn [k] [:div {:style (gen-style 4 k)}]) discs)])]
    [:div
      (hanoi-rod "left" [1 2 3 4])
      (hanoi-rod "middle" [])
      (hanoi-rod "right" [])]))
;;
(defn hello-world []
  [:div
   [:h1 (:text @app-state)]
   [:h3 "Edit this and watch it change!"]
   (hanoi-tower)])
;;
(defn find-aux [src dst]
	(let [x (s/difference #{:left :middle :right} #{src dst})]
		(if (= (count x) 1)
			(first x)
			(throw (js/Error. (pr-str "Can't find aux: " x))))))
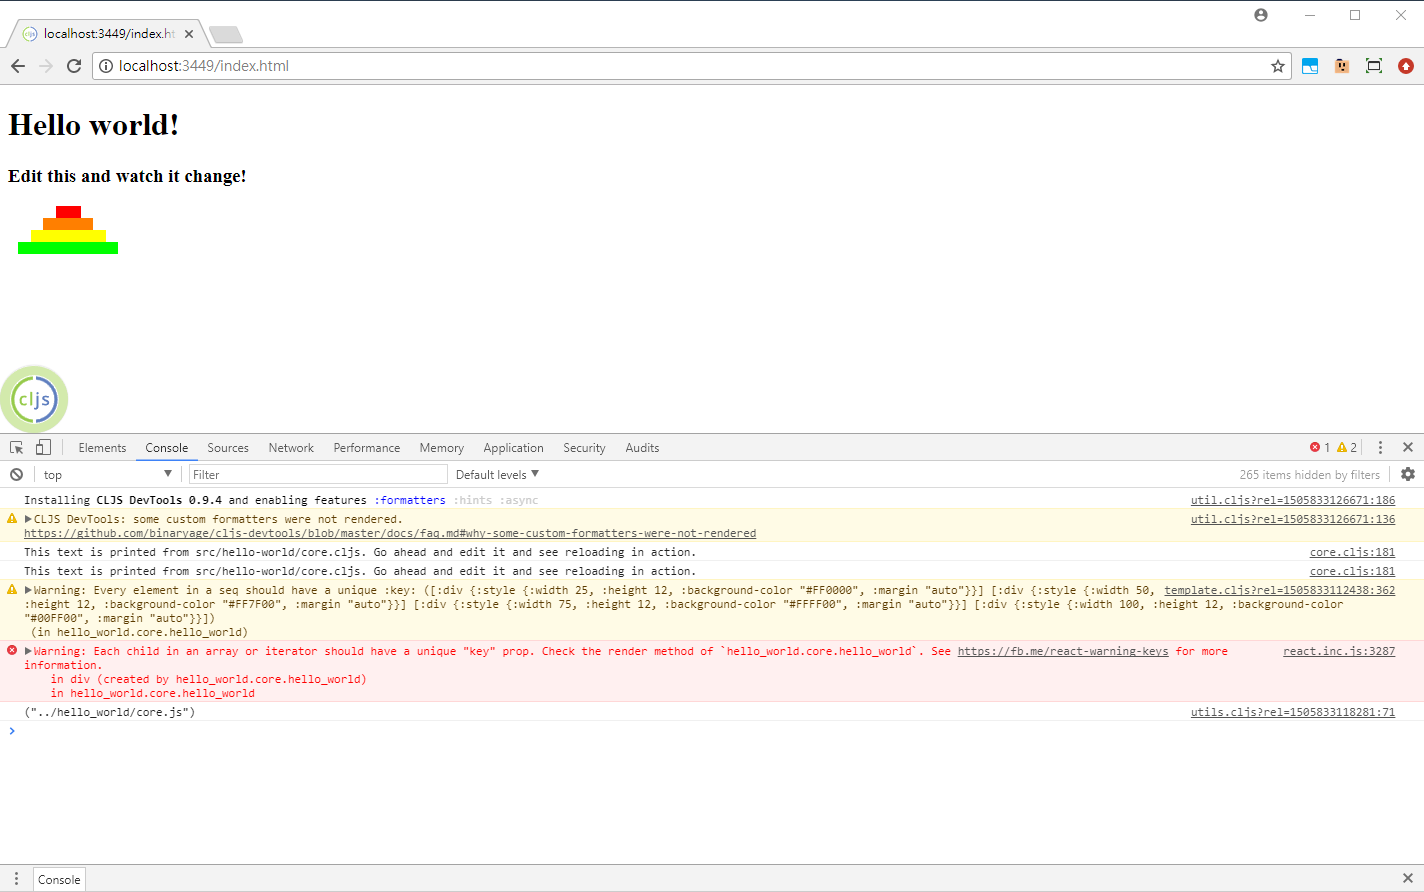
Live reloading without page refresh. Note the HUD at bottom left.
Notice the changes in both browser tab as well as browser console output (a line is printed that shows which files are reloaded), and the fact that there is no page refresh. Also notice the flashing Clojurescript logo at bottom left. This is called the Head-up-Display (HUD) (More on this later). Going back to our application, we now have a very basic Hanoi Tower UI - which is totally hacked together - going.
The console we launched our application with is now a live REPL with direct access to the currently running application. We can try this out by invoking functions we’ve just entered, after application launch:
dev:cljs.user=> (require '[hello-world.core :as c])
nil
dev:cljs.user=> (c/find-aux :left :right)
:middle
dev:cljs.user=> (c/find-aux :left 4)
#object[Error Error: "Can't find aux: " #{:right :middle}]
   hello_world$core$find_aux (file:/C:/Users/Owner/Documents/clojure_exp/figwheel-basic/hello-world/src/hello_world/core.cljs:57:11)
nil
dev:cljs.user=>
We then proceed to write a recursive function that solves the puzzle by returning a sequence of moves (each move is a vector of the form [from to]), right inside the REPL:
dev:cljs.user=>
(defn hanoi-solution [n src dst]
	(if (= n 1)
		[[src dst]]
		(let [aux (c/find-aux src dst)
			  pre (hanoi-solution (- n 1) src aux)
			  post (hanoi-solution (- n 1) aux dst)]
			(concat pre [[src dst]] post))))
#'cljs.user/hanoi-solution
And tests in a similar way:
dev:cljs.user=> (hanoi-solution 4 :left :right)
([:left :middle]
 [:left :right]
 [:middle :right]
 [:left :middle]
 [:right :left]
 [:right :middle]
 [:left :middle]
 [:left :right]
 [:middle :right]
 [:middle :left]
 [:right :left]
 [:middle :right]
 [:left :middle]
 [:left :right]
 [:middle :right])
dev:cljs.user=>
Now that it works, copy the function definition and save the file.
Let’s go back to working on the UI. Right now the discs are hard-coded, so let’s modify our state and starts wiring them in.
Edit the file with the following structure (Note that the atom here is an reagent atom - it is watched by reagent to trigger UI update whenever its content is changed):
(defonce app-state (atom {:text "Hello world!" :nb-disc 4 :disc { :left [1 2 3 4] :middle [] :right [] } }))
Save. Then try to extract value at the REPL:
dev:cljs.user=> (:nb-disc @c/app-state)
nil
Wait, it didn’t work! Why?
At this point, we’ll need to discuss what “reloadable code” mean. Literally, they are simply code that are safe to be reloaded. To a first order approximation to be reloadable is to be purely functional - calling code that define a pure function twice will merely redefine it, in effect rebinding it to the same symbol (More accurately the Vars named by the symbol in Clojure(script) to avoid confusion). Therefore one can already get pretty far in having reloadable code by following the recommended style of writing Clojure(script) using mostly pure functions.
Of course, real application cannot be completely pure - they by necessity will have some state. However one can still manage them by, say adopting the Onion architecture etc. Regardless of the name, the basic idea here is to be explicit about your states and push it to the “edge” of the system (if you’re doing backend) or to have a central store of states and channel all states updates through a common interface (Which is part of the core idea of the flux architecture). Explicit states can be made to be reloadable through defonce - this ensure it won’t be redefined (and hence overwritten) if it is already defined.
So to recap, our program should be written to consists of just pure functions plus an explicit application state, and we want that state to survive a reload, and this is done through using defonce. The cost to pay is that whenever we change our schema for the application state, we would need to “migrate” that schema manually.
In theory, following the instructions above should mostly suffices. In practise though things are complicated and one needs to be careful not to accidentally introduce (hidden) mutable states, and these can be pretty subtle. For this particular point this page explains it much better than I can hope to, so be sure to check it out.
No big deal. Back at the REPL:
dev:cljs.user=> (swap! c/app-state assoc :nb-disc 4)
{:text "Hello world!", :nb-disc 4}
dev:cljs.user=> (swap! c/app-state assoc :disc { :left [1 2 3 4] :middle [] :right [] })
{:text "Hello world!",
 :nb-disc 4,
 :disc {:left [1 2 3 4], :middle [], :right []}}
dev:cljs.user=>
Now we’re back in the game/business of updating the UI. Edit the source file and save:
(defn hanoi-tower []
    (let [hanoi-rod (fn [pos discs]
                       [:div {:id pos :style {:display "inline-block" :width 120}}
                             (map (fn [k] [:div {:style (gen-style (:nb-disc @app-state) k)}]) discs)])]
    [:div
      (hanoi-rod "left" (get-in @app-state [:disc :left]))
      (hanoi-rod "middle" (get-in @app-state [:disc :middle]))
      (hanoi-rod "right" (get-in @app-state [:disc :right]))]))
Though nothing seem to have changed, now the UI is wired to present the underlying state. Try to update the state manually and see what happen! Enter at REPL (omitting output):
(swap! c/app-state assoc :disc { :left [2 3 4] :middle [] :right [1] })
(swap! c/app-state assoc :disc { :left [3 4] :middle [2] :right [1] })
(swap! c/app-state assoc :disc { :left [3 4] :middle [1 2] :right [] })
(swap! c/app-state assoc :disc { :left [4] :middle [1 2] :right [3] })
(and so on if you fancy)
Notice how the browser’s UI update itself, live, as you enter these commands.
For the next step, we will add control elements to the UI so the user can “play” with it. Add this to the source and save:
(defn control-panel []
    [:div
        [:span "Number of Discs: "]
        [:input {:id "num" :type "text"}]
        [:input {:id "reset" :value "Reset" :type "button"}]
        [:input {:id "solve" :value "Solve!" :type "button"}]])
By the way, notice how our (manually modified) state is preserved even though we have updated our source code.
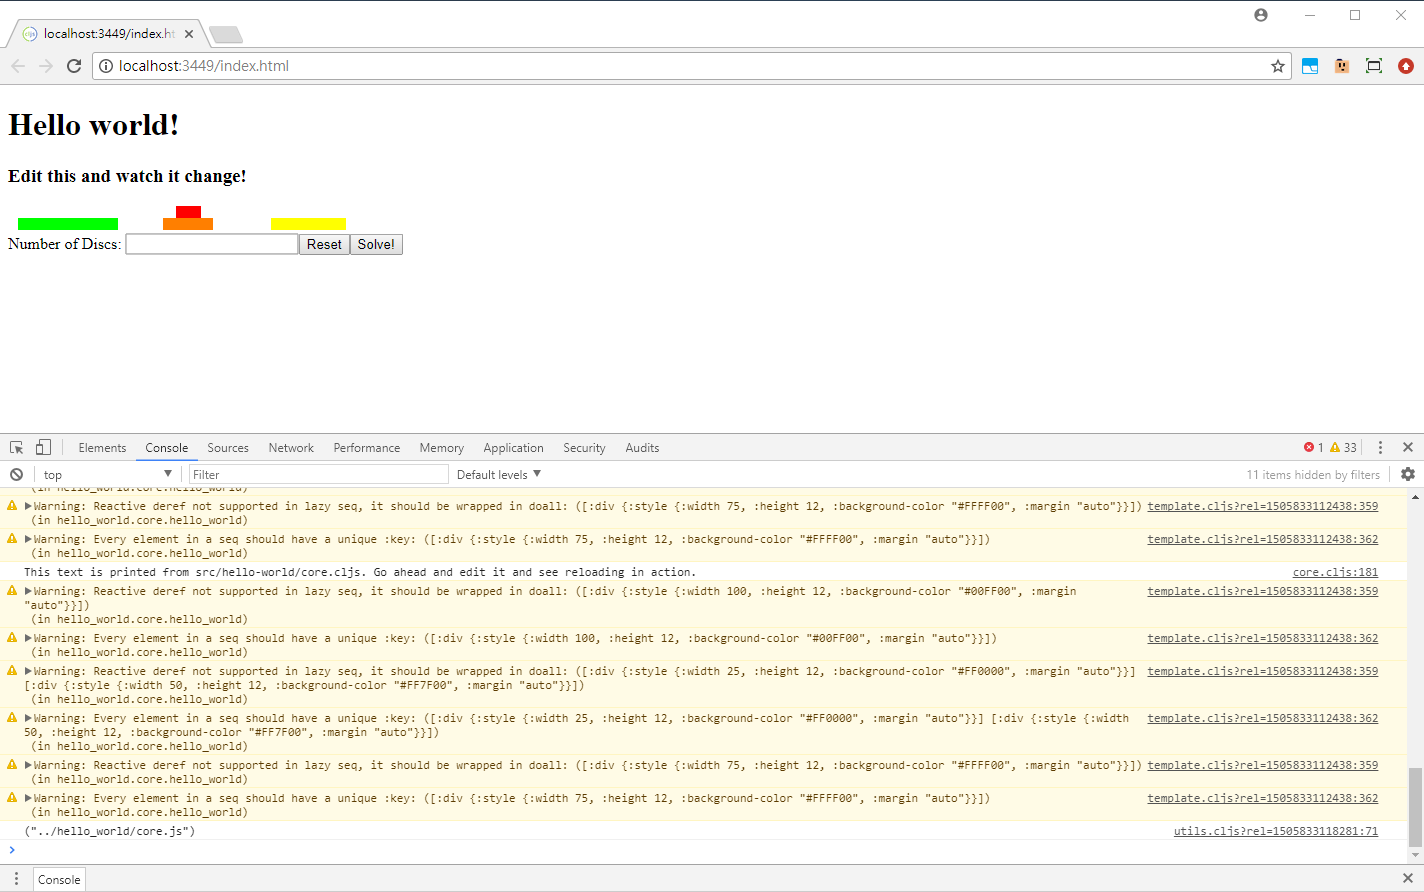
Our App at the end of this subsection. Note that the application state (the number of discs as well as their location) is preserved across live reloading.
Bonus Session
(What follows is basically more of the same from a setup point of view. You can play along though if you want to also learn the frameworks, since we’ll use some features in a slightly less shallow manner)
Now let’s add event handler dynamically. (later we will save it back to the source)
First design a function to construct the :disc attr (by the way, you may have noticed by now that these long REPL transcripts are somewhat sanitized, but not 100%: I want to highlight how you can always try again and recover from mistakes):
dev:cljs.user=> (range 1 4)
(1 2 3)
dev:cljs.user=> (defn init-tower [n] {:left (range 1 (+ n 1)) :middle [] :right []})
#'cljs.user/init-tower
dev:cljs.user=> (init-tower 5)
{:left (1 2 3 4 5), :middle [], :right []}
dev:cljs.user=> (defn init-tower [n] {:left (apply vector (range 1 (+ n 1))) :middle [] :right []})
#'cljs.user/init-tower
dev:cljs.user=> (init-tower 5)
{:left [1 2 3 4 5], :middle [], :right []}
dev:cljs.user=>
Then hook the element (*1 in REPL can be used to refer to the result of last evaluation):
dev:cljs.user=> (.getElementById js/document "reset")
#object[HTMLInputElement [object HTMLInputElement]]
dev:cljs.user=> (.addEventListener *1 "click" (fn [e] (let [n (.-value (.getElementById js/document "num")) ] (swap! c/app-state assoc :nb-disc n :disc (init-tower n)))) false)
nil
dev:cljs.user=>
If you try it out, you’re going to be badly surprised:
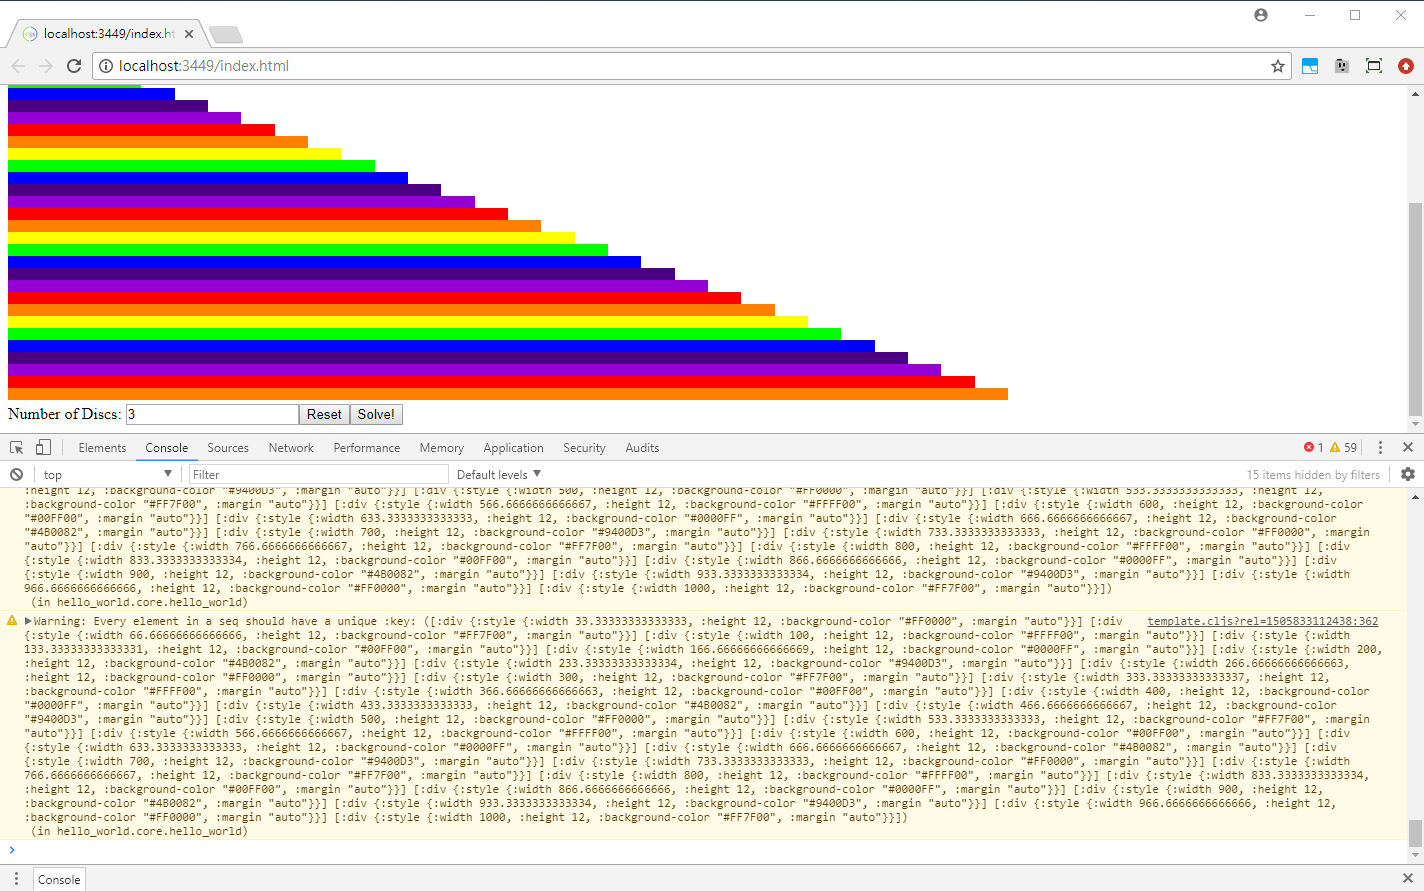
Epic Fail! Why? (And the rainbow...)
Why, use the REPL to debug! Examine the state: @c/app-state
It’s strange that the :disc has such a value. On a moment’s thought, the text field is a string, so we check our suspicion:
(init-tower "1")
Viola, that’s our my mistake. 4 Once we know what’s up, fixing it is relatively straight forward, just pass the extracted value through a js/parseInt call (REPL transcript omitted).
Now that we are done, let’s update the source code:
(defn control-panel []
    [:div
        [:span "Number of Discs: "]
        [:input {:id "num" :type "text"}]
        [:input {:id "reset" :value "Reset" :type "button"
                 :on-click #(let [n (js/parseInt
                                            (.-value (.getElementById js/document "num"))) ]
                                        (swap! app-state assoc :nb-disc n :disc (init-tower n)))}]
        [:input {:id "solve" :value "Solve!" :type "button"}]])
Exercise: Wire the button so that it trigger solving the puzzle, playing each step automatically with a reasonable time delay (so mere mortals can see what’s happening). (Hint: read the website for reagent)
Heads Up Display
I’ve promised to talk about that. So what if we’ve got a mistake in the source code (which we have mostly avoided since we always test things out in the REPL before “committing” them in the source)? Try to edit the handler for the reset button (or add if you didn’t do the bonus session), say by making the handler function’s parentheses unbalanced:

Sample Error

Sample Warning
After saving, you will notice a warning window in the browser tab that shows where the error is. Interestingly, the application still works! (Don’t trust me, try to click “Solve!” if you’ve done the exercise in the bonus section. If not, update the state manually in the REPL)
After you’re done, revert the event handler back to the right form.
Sourcemap and Breakpoint
This and the next feature require some simple browser setup. Assuming you’re using Chrome, open the developer console (Ctrl-Shift-I), click the Customize and control DevTools button on top right corner (which looks like three dots arranged vertically), and click settings. You will see the following screen:

Setting up Chrome for Sourcemap and Custom Formatter
Make sure that both “Enable JavaScript source maps” and “Enable custom formatters” are clicked.
Source map is a chrome feature that allows mapping compiled javascript file’s location back to actual source location. The benefit it provides is that when debugging using the browser’s breakpoint, one will now see more meaningful source code.
To test this, edit the function hanoi-solution and add the line:
(defn hanoi-solution [n src dst]
    (if (= n 1)
        [[src dst]]
        (let [aux (c/find-aux src dst)
              pre (hanoi-solution (- n 1) src aux)
              post (hanoi-solution (- n 1) aux dst)]
            (js-debugger)
            (concat pre [[src dst]] post))))
Now enter the following in REPL:
(hanoi-solution 4 :left :middle)
(Alternatively, edit the event handler for the “Solve!” button to call that function)
Chrome will pause in the debugger:

An example debugging session in Chrome with sourcemapping. The stacktrace also shows Clojurescript data structures but not the function arguments in the main screen. Read the main exposition for more explanation.
Notice how clojurescript source, rather than javascript, is shown. Also notice an integer parameter after the filename: this is a feature of our project turned on by the :source-map-timestamp switch in project.clj, under the section for :cljsbuild. Its purpose is to ensure we always get the latest source code, rather than the (HTTP) cached version which may get outdated as we live edit it. (The number is a timestamp so it always change across live/hot reload)
Now look at the call stack, where again clojurescript function is used, as well as the local variables (again located at the right column under the call stack). To see variables in outer scope, you have to click earlier entries in the call stack. Also notice the limitation that custom formatting doesn’t work on the live-inspection of argument passed to function. 5
Aside from using clojurescript function, in browser breakpoint also works: click on the line in the find-aux function, and click “continue” to see it pause on that breakpoint as well.
Since this is a recursive function, you may click on “continue” a few more times to see the evolution of evaluation.
Custom Formatter via cljs-devtools
Again, make sure you’ve done the setting from last section. If not, when you type the following to REPL:
(.log js/console [:foo "bar"])
You’ll see the following screen:
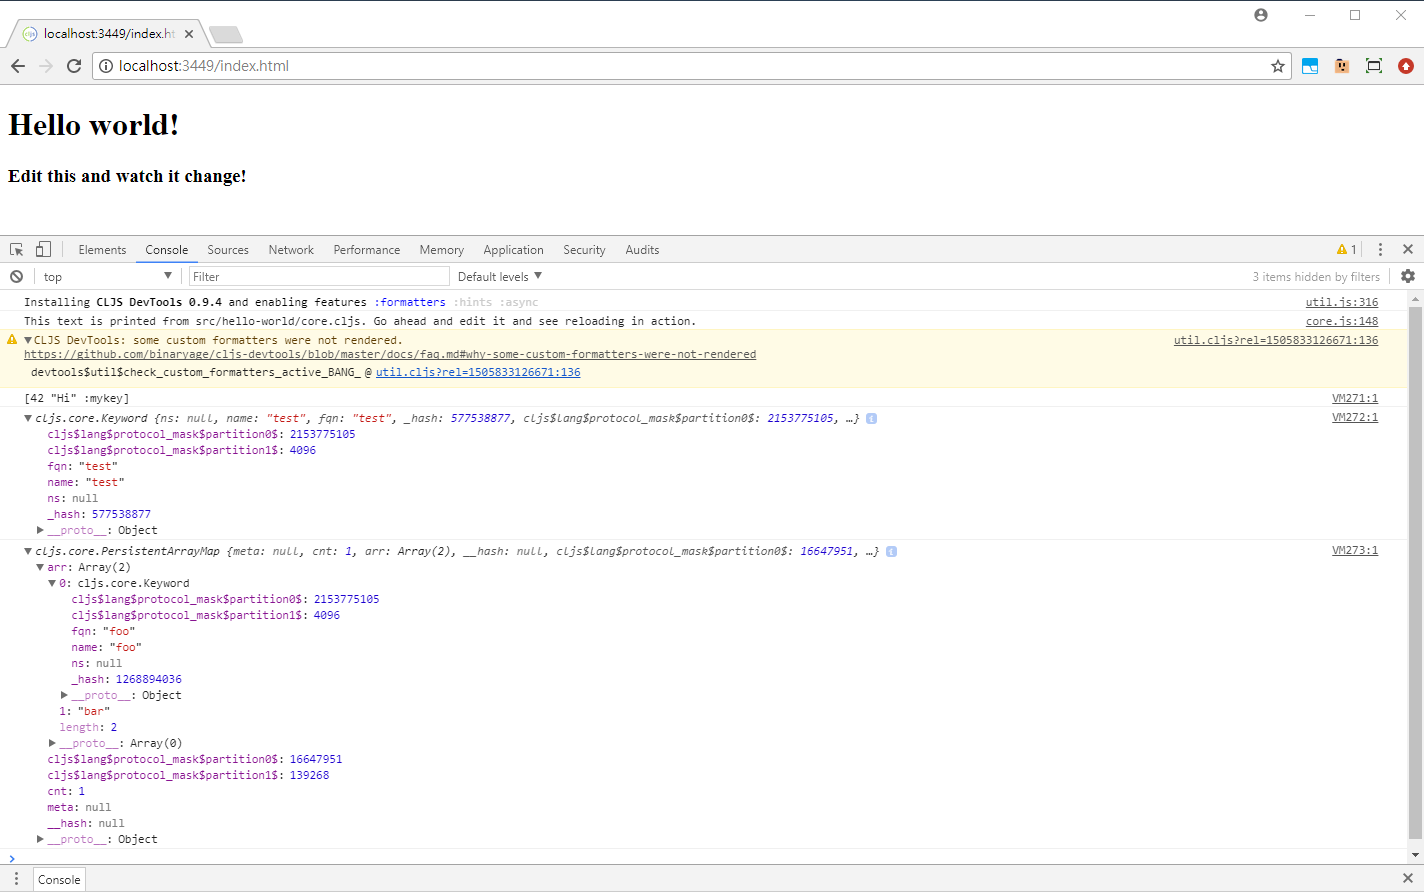
The results of console logging clojurescript data without setting up custom formatting - we instead got the raw, underlying javascript data.
So if we have done the setup and then enter the following into REPL:
(.log js/console c/hanoi-tower)
(.log js/console @c/app-state)
(.log js/console (c/hanoi-solution 4 :left :middle))
We’ll get this:

Custom formatters provided by cljs-devtools, which let us examine Clojurescript data structures and also show other stuffs such as functions nicely.
Devcards
As an alternative to developing your application directly, Devcards give you an interactive, visual, REPL-like development experience that is like doing demo for each of your application’s component. Perhaps a picture is better here:
Asides from being plain cool, a deeper reason for doing thing this way is to decouple, or separate, the generic components being developed from the application context where it is used. This allows one to explore its state, structure, and behavior more effectively and directly.
To get started, we will scaffold a new project. Go to a new directory and enter:
lein new devcards devcards-demo
(Our project name is devcards-demo)
The generated project is also a figwheel project, so start it up in the usual way. Then visit the page at http://localhost:3449/cards.html. You will be greeted with the following screen:

Main page of a Devcards project, with a listing of available pages.
The project has a default page setup for us. Click on it to see the default card:
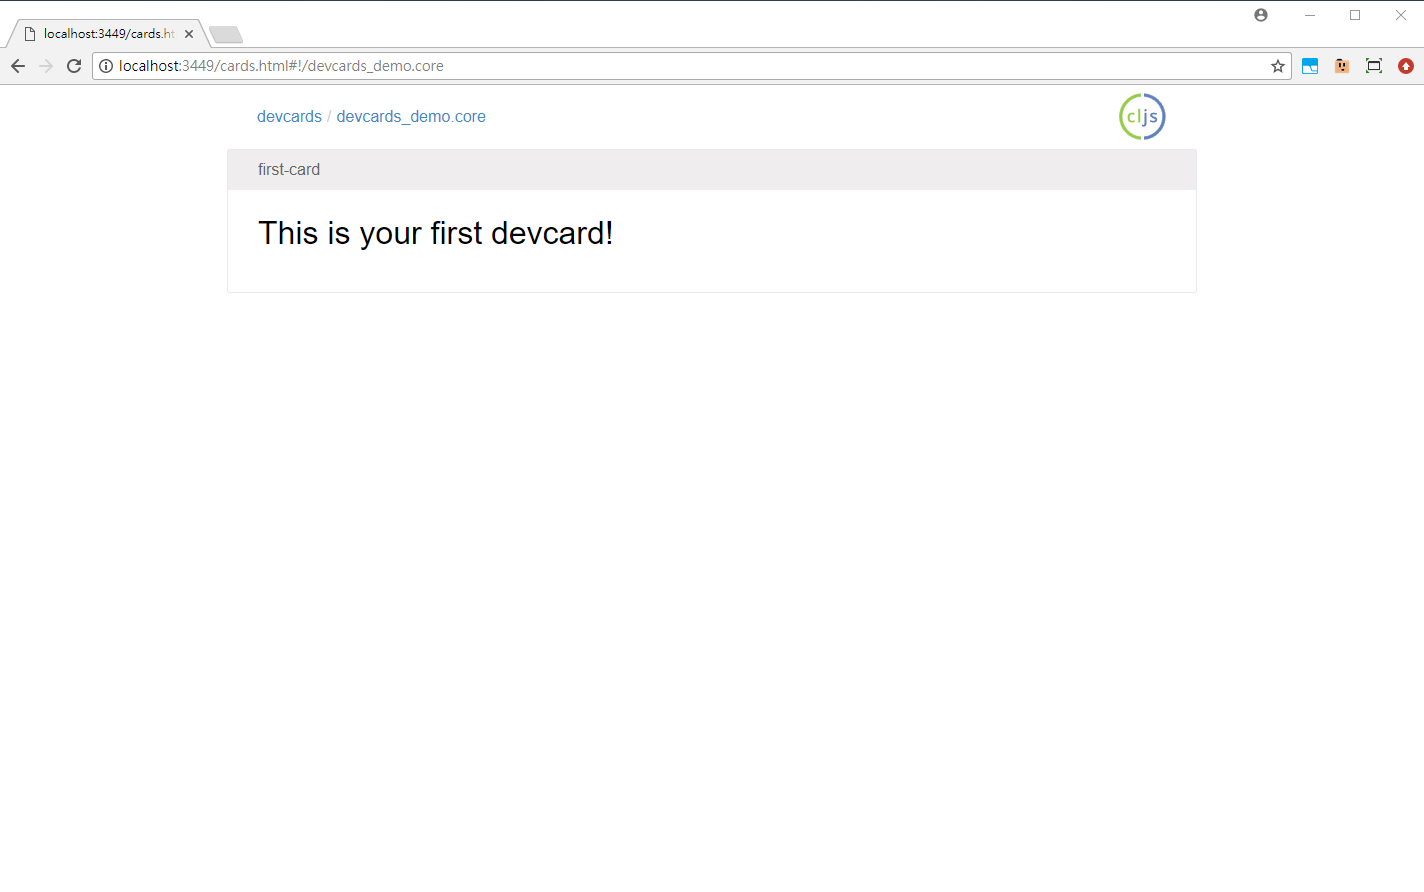
A Devcards page. Each card is displayed sequentially.
Now we want to integrate the code we have so far into it. First update our project.clj to choose the framework. In our case we chose reagent at the beginning, so update this line:
:dependencies [[org.clojure/clojure "1.8.0"]
                 [org.clojure/clojurescript "1.9.229"]
                 [devcards "0.2.3"]
                 [sablono "0.7.4"]

                 ;; need to specify this for sablono
                 ;; when not using devcards
                 [cljsjs/react "15.3.1-0"]
                 [cljsjs/react-dom "15.3.1-0"]
                 #_[org.omcljs/om "1.0.0-alpha46"]
                 [reagent "0.6.0"] ;; <-- Update this line
                 ]
Notice that #_ is the “dispatch” reader macro for ignoring the next form, which can be thought of as a stronger form of commenting. Remember to restart the project after that for lein to download and install new dependencies.
After that, we update the require in the source code:
(ns devcards-demo.core
  (:require
   #_[om.core :as om :include-macros true]
   [reagent.core :as reagent] ;; For the atom
   [clojure.set :as s] ;; Our app's require
   [sablono.core :as sab :include-macros true])
  (:require-macros
   [devcards.core :as dc :refer [defcard deftest defcard-rg]])) ;; Add defcard-rg
To bring in the new reagent library and remove om. 6
Next, copy the source code of the app we’ve been writing so far into core.cljs, in between (enable-console-print!) and the defcard, while taking care to still use Reagent’s atom implementation (as we’re not refering the atom in reagent namespace anymore), so our state should instead look like:
(defonce app-state (reagent/atom {:text "Hello world!" :nb-disc 4 :disc { :left [1 2 3 4] :middle [] :right [] } }))
Then we want to create a new card that holds our whole app, and to do so require using the interface correctly (with reagent integration).
Fortunately the library has a guide on how to do that. The gist of it is that since Devcards is designed to handle ReactElement for DOM-tree (alongside support for displaying plain Clojurescript data structure), we need to call reagent.core/as-element to convert reagent code into those elements. The macro devcards.core/defcard-rg do this and in a smart way that handles the interface details (like when we pass a function that returns DOM-tree like object instead) automagically.
By the way the guide above also has documentations for various aspects of Devcards - you may browse around through the navigation menu at the top of the page.
Add the following code:
(defn hanoi-tower-widget []
  [:div
   [:h1 (:text @app-state)]
   (hanoi-tower)
   (control-panel)
   ])

(defcard-rg hanoi-tower-card
  [hanoi-tower-widget]
  app-state
  {:inspect-data true
   :frame true
   :history true})
Now we have our app embedded in as a card:

Adding our app as a card. Note that the current state is displayed below.
The last argument in our defcard-rg macro call controls the meta-feature provided by Devcards. inspect-data give us a view into the current component state as the screen capture above shows; frame simply add a border around the card; history records the history of state change and allows one to “time-travel” (One of the super-power of the functional-reactive style, enabled by completely teasing out the state and controlling its mutation strictly) - we will see this play out later.
Suppose we want to enhance this widget so that user can play with the puzzle themselves by supplying their own moves. First we add the UI: add the following code for generating a disc selection menu:
(defn disc-select [id-prefix]
    (letfn [(disc-item [id input-name label val]
                [:li
                    [:input {:id id :type "radio" :name input-name :value val}]
                    [:label {:for id} label]])]
        [:ul {:style {:display "inline-block" :list-style "none" :padding-right "20px"}}
            (disc-item (str id-prefix "-left") id-prefix "Left Disc" "left")
            (disc-item (str id-prefix "-middle") id-prefix "Middle Disc" "middle")
            (disc-item (str id-prefix "-right") id-prefix "Right Disc" "right")]
        ))
Then update the control panel (with a dummy event handler):
(defn hanoi-ui-move! [e]
    (do))

(defn control-panel []
    [:div
        [:div
            [:span "Number of Discs: "]
            [:input {:id "num" :type "text"}]
            [:input {:id "reset" :value "Reset" :type "button"
                    :on-click #(let [n (js/parseInt
                                                (.-value (.getElementById js/document "num"))) ]
                                            (swap! app-state assoc :nb-disc n :disc (init-tower n)))}]
            [:input {:id "solve" :value "Solve!" :type "button"}]]
        [:div {:style {:display "table"}}
            [:span {:style {:display "table-cell" :vertical-align "middle"}} "From:"]
            (disc-select "from")
            [:span {:style {:display "table-cell" :vertical-align "middle"}} "To:"]
            (disc-select "to")
            [:span {:style {:display "table-cell" :vertical-align "middle"}}
                [:input {:id "move" :value "Move!" :type "button"
                        :on-click hanoi-ui-move!}]]]
        [:div {:id "hanoi-error" :style {:color "red" :background-color "#f1f1f1"}}]])
After that, develop the pure functions for validating the move and performing the move (which is a function from current state to next state). This should be done via the REPL as before, for reference below is one solution:
(defn move-disc [discs src dst]
    (let [item (first (src discs))]
        (-> discs
            (update src #(apply vector (rest %)))
            (update dst #(apply vector (cons item %))))))

(defn validate-move [discs src dst]
    (if-let [item (first (src discs))]
            (or (empty? (dst discs)) (< item (first (dst discs))))
            false))
Again testing it out in REPL:
devcards:cljs.user=> (move-disc {:left '(1 2 3 4) :middle '() :right '()} :left :right)
{:left [2 3 4], :middle (), :right [1]}
devcards:cljs.user=> (move-disc {:left '(3) :middle '(2 4) :right '(1)} :middle :left)
{:left [2 3], :middle [4], :right (1)}
devcards:cljs.user=> (validate-move {:left '(2) :middle '(1 4) :right '(3)} :left :right)
true
devcards:cljs.user=> (validate-move {:left '(2) :middle '(1 3 4) :right '()} :middle :right)
true
devcards:cljs.user=> (validate-move {:left '(2) :middle '(1 3 4) :right '()} :right :left)
false
devcards:cljs.user=> (validate-move {:left '() :middle '(3 4) :right '(1 2)} :middle :right)
false
Finally, we tie in everything together and tidy up some bits with the following code for acting on the UI as well as the event handler itself:
(defn rod-str->label [str-val]
    (case str-val
        "left" :left
        "middle" :middle
        "right" :right
        nil))

(defn get-radio-val [radio-name]
    (let [el (.querySelector js/document
                    (str "input[name=\"" radio-name "\"]:checked"))]
        (if (nil? el)
            nil
            (.-value el))))

(defn set-err-msg [msg]
    (set! (.-innerHTML (.getElementById js/document "hanoi-error")) msg))

(defn hanoi-ui-move! [e]
    (let [from-val (rod-str->label (get-radio-val "from"))
          to-val   (rod-str->label (get-radio-val "to"))]
        (cond
            (nil? from-val) (set-err-msg "Please select from disc.")
            (nil? to-val) (set-err-msg "Please select to disc.")
            (= from-val to-val) (set-err-msg "From disc should be different from to disc.")
            (not (validate-move (:disc @app-state) from-val to-val)) (set-err-msg "Invalid move.")
            :else (do
                    (swap! app-state assoc :disc (move-disc (:disc @app-state) from-val to-val))
                    (set-err-msg "")))))
Below is our finished app:

Final state of our Devcards app. It supports user moves. Notice the highlighted tooltip for time-travelling.
Endnotes
Phew! This is a pretty long post for an introductory topic! I hope you enjoyed it. It turns out that there are other articles/series on the web that offer something similar, and I heartily recommend the following if you’re interested for more:
- This workshop is more comprehensive/deep in its coverage of topics and worth working through if you want to deep dive, head first, into actually using Clojurescript.
- Exploring the Clojurescript REPL is somewhat similar in scope to this article, the difference being that it gives more in-depth explanation of both language level as well as library level mechanism.
Until then! See you!
(To be continued…)
-
See How it feels to learn JavaScript in 2016, although even the Javascript community has recognized this problem and is working on it, hence the response How it feels to learn JavaScript in 2017. (But it doesn’t cover build tools…) ↩
-
Javascript is ubiquitous, but its original version is done over the span of a bit more than a week, and so there are many rough edges. For example, its type system is… subtle. (In defense though it is good practise to use strict equality to avoid these headaches) If this is too religious (in both meanings in this context) for your taste, a simpler pain point is the lack of module/namespace/package in the original language, with the results being this. ↩
-
Given how other ecosystem have been catching up, in theory these difference aren’t intrinsic anymore. However, it could still be argued that these desirable traits are more easily/naturally achieved in Clojurescript than other languages. ↩
-
Don’t laugh, this is the actual mistake I made while preparing this tutorial. In fact I struggled a lot on this part due to all the fuse about interoping with Javascript directly, without the help of even a jQuery analog (There are libraries available, but you will need to restart the whole application due to
project.cljchange). ↩ -
This is quite a pity - to resolve this we may use the Dirac Chrome extension which I plan to write in the next post in this series. ↩
-
For some reason even restarting doesn’t work for me, so I entered
(reload-config)at figwheel’s REPL and then force refresh the browser’s page (Ctrl-F5) to truly rebuild everything. ↩